STAMPING SUPPLIES FOR SALE

Wednesday, January 28, 2009

Simple Birthday Gift...

...because Mom really doesn't need anymore coffee for her birthday! My Mom always gives, so I thought why not give her something she'd really enjoy...like a candle! I purchased the candle from Bath & Body works and wanted to dress it up a bit. If I can't send a bouquet, why not just make one right? I love the sparkle on these 3-d flower stickers. I attempted to spread them out so it would look like a bouquet/spring garden. The sentiment is from Stamping Bella.I wanted to keep the nice clean design of the candle container so I just added some simple kraft ribbon and attached the card with sheer white ribbon. The card is made from my scalloped square punch. To trim the white cs, I simply used my CM trimmer and cut the cs down 1/4 inch. Lastly, I added some rhinestones and sent this gift on its way!

Tuesday, January 27, 2009

Looking for a great IDEA for someone special??

This would be a wonderful project for your Valentine, or how about something fun for the kids?? I'm sure my girls would want 100 Chuck E. Cheese coupons in the mini card file! Give it a try with the Luv-O-Dex from Glue-Art & Paper Studio! I love all their products, which are high quality unfinished wood just waiting to be decorated with some yummy paper. This kit comes with all the supplies you will need to get started: 14 limited edition Luv-O-Dex cards, mini card file, over 100 plain cards (that would make a TON of Love coupons...lol), paper, ribbon & embellishments! You get all this for only $14.00..very reasonable for great, high quality wood products. I've got mine on order and will share my creation as soon as my little sticky fingers open the box. SO what are you waiting for??!!!


Here are some other great Glue-Art & Paper Studio products you'll have fun with!

Monday, January 26, 2009

"Made" for Him...

ETA: I've added the "subscribe" feature on the upper-left of my blog. This is for those many emails that have asked if I would add this feature...please let me know, if you do subscribe how it works. I'm "techy-challenged" so I'm not familiar with this format?

Some how with an image like this, I TOTALLY think my hubby will get over the fact that his card is drowning in shades of pink and red! I'm sure this is EXACTLY how all housewives do their chores..NO?? Anyhoo, it's a good laugh for all! I just have to say that Kim over at My Favorite Things is a very sweet and wonderful gal. I'd had some shipping issues with this Maid for You set and then I think it was delayed again in Raleigh due to the snowstorm we'd had. She was very gracious to track it down for me! I'd like to blame it on the postman gawking at such a sight, but I doubt my postLADY was holding it hostage...lol Anyhoo, here are the finished products and I'm thrilled with the outcome. I'm starting to get a better grasp on using my Copic markers. It took me a little longer to learn the shading techniques and layering the colors, but I'm getting there. The floor board looked a little dull for me in all brown so I used my Black Spica Pen to add some lines and nails. The paper is from the Target $ Spot and where I placed my heart brads were some pink hearts on the paper so I used those as my guide. I hadn't intended on putting them there, it's just how the paper cut.
One sassy gal! I just stuck with the same colors but different sketch here. The Heidi Swapp Ghost Heart is from MFT and I colored the back side with my Lipstick Red Copic Maker. You can see it here, but I probably should have let it dry and then added another coat of ink, but it'll do! Also, today is the start of Chinese New Year and I thought I'd share some pics we took this morning before school. Grace wore this outfit last year and it dragged just a tad...not this year! I noticed the sleeves are getting shorter and the pants a little snug {sniff, sniff}. I went and shared a little presentation with her class as well as shared some Chinese candies with her classmates. I always get a kick out of her letting us know that she is "half-Chinese AND Eng-A-lish"...lolHere is my other China Doll, Addison. Lovin' that grin! You wouldn't know that just 20 mins. prior to this pic that she fell and tore her tights and skinned her knee:(

Friday, January 23, 2009

Breakin' Out Some New Paper & Quickie Tutorial...

...because you can only use so many sheets of blue/pink/chocolates combinations! Believe it or not, I do LOVE other colors and was excited to finally open some new paper that has been sitting in my plastic bins. This is SU! Bella Rose. I used two sides, from two different sheets to add some contrast. The patterned paper is matted on SU! Old Olive and Bazzill Red Basic. I have used the black/red combo more than I can count, BUT this is new polka dot paper with a cute scallop on the bottom. The umbrella is also done different than in the past. I cut out the umbrella then stamped with PTI-Spiral Bouquet in SU! Whisper White craft ink. Sonoma by Scenic Route. This is double sided as well, so I just coordinated her raincoat with the berry-floral print. The patterned paper is matted on SU! Always Artichoke and Bazzil Red Basic. Since I work the with copic markers I have, I had some trouble getting just the right shade on the boots to match the burnt red of the coat scallop. With a few tries, I was able to mix a little red and brown and got the PERFECT match! These markers are really neat and because they are alcohol based you can mix several colors without them blending together on the marker tip!So I thought you might be wondering why you never see me use the umbrella that actually comes with this MFT-Rain or Shine set right?? Well, actually, I DO! You just can't see how I put it use so I thought I'd share a quick tutorial! Step 1: Stamp your image. There is no need to completely stamp the image. You will be flipping it over.
Step 2. Cut you image straight on the bottom of the scallops.Step 3. Trim the top.Step 4: Use a scalloped punch (I used SU! long scallop here) along the bottom of the paper you will use as your matte. Trim around the top just slightly larger than your dome shape.Step 5: Here is your sassy little umbrella. Just add a strip of cs and add some rhinestones on top. To keep my rhinestones perfectly spaced, I just use the "v" shape of the scallop as my guide.

Thanks Jane for your email inquiry! I hope this helps!


Wednesday, January 21, 2009

Snow Day & V-Day...

ETA: Be sure to scroll to the bottom for today's craft post:)

Sorry I missed my post on Monday...we were a little busy:) The kids are home from school for two days and from the looks of it, they aren't complaining!Snow...an odd sight on the coast of North Carolina. And yes, we do it in STYLE...check out the boogie board sled! Squeeze me tight Mommy!
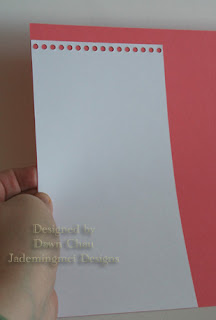
My oldest, Grace, in all her glory!
Little pumpkin Addison! How do you lounge in the snow?

Can you see just beyond the trash can?? See that dude outside with a jogging stroller and a dog chasing him down? Yes, that is my nut of a husband. While the rest of us intelligent folks would be inside sipping hot cocoa HE would rather be running in it!

This is the first year for my daughter to really get all excited about Valentine's Day. Grace was more than thrilled to help me out on this project! We decided on the Kim Hughes-Little Boy set. I like these particular images because you can color them for boys and girls...regardless of the stamp set name...lol I had to laugh once I was all done and ready for her to write her name on the front (the classmates names are on the back). You see the frog one? Well in my world the sideways sentiment looks perfectly fine, but not to a kid! She began writing her name and got the first 2 letters when she paused and said, "Wait Mommy, you have the ribbon the wrong way, I NEED to fix it!" Mind you, she is only 4 year's old, but she has inherited my anal-retentive side just a tad!
The thing I love most about mass-producing for the kids, is that I try to use a lot of different colors and products. It's a great way to spread your supplies without having to run out of that really expensive patterned paper you've been hoarding. I know for the most part these cards will find their way to the trash (GASP!!) so it's a good time to use all of those scraps and buttons you have lying around!

Friday, January 16, 2009

Behind the Seam's--Part 2

Here is the end result of Wednesday's tutorial on altering a spiral notebook! I also splurged and made a card to compliment my notebook.I've been wanting to use these Heidi Swapp flowers for a while, but never had the right paper to match. These flowers come in a package with approx. 12 inside and they are HUGE--a little over 4 inches in diameter. With the size of the flower being so large, I wanted to keep the rest of the design simple. I paired the flower with SU! Cameo Coral and Certainly Celery CS. The strips of cs are cut at 1/2 inch and trimmed on the sides. After attaching the flowers, I sewed the strips on to the white Bazzill CS and matted them. Now I only sewed thru the white cs because sewing thru all the layers would break my sewing needle. The lettering is cut with my Cricut and I added some Diamond Stickles to just the top layer. The ovals are cut with my nesty dies. One more shot of the card. Same directions as above! This is a regular A2 size card, however with the flower on top, it requires a 5x7 envelope. I couldn't resist though, I LOOOOVE these flowers now:) I also have these in white and tried to dye them with my SU! re-inkers, but the color does not hold well. There must be some sort of "secret" out there?

Wednesday, January 14, 2009

Behind the Seam's--Altering Notebooks...

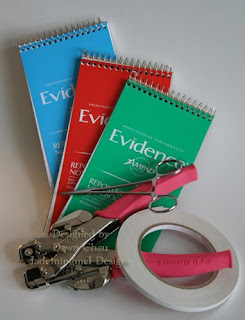
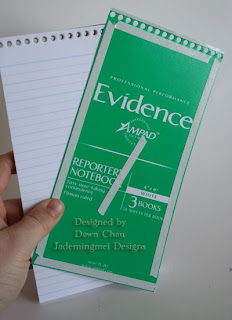
A super fast and easy way to turn an ordinary notebook into something fantabulous! You can do this with any size notebook, but for this particular project I really like to use these Evidence notebooks that I purchased at Staples. When I purchased these in NY they were called Reporter's Notebooks...essentially the same thing! Let's get started. 1. Supplies-Notebooks, Crop-a-dile, Sticky Tape, and Locking Hemostat Pliers(you can use needle-nose pliers as well).
2. Starting on the right side of the notebook, use the pliers to twist and untangle the spiral.
3. Repeat with the left side.
4. Now, while still on the left side of the spiral, make sure you bend the spiral loop to the back. This is going to be important when your unwinding the spiral out so you don't fray any of the papers with the sharp edge.
5. Turn the spiral until its completely out. Notice how the right side is NOT bent back as on the left side? This is not needed because the right side will not be going all the way back thru the punched holes.
6. Once you've taken out the spiral, apply your sticky tape. I add a full strip of tape to the top and use a razor blade to trim off the excess. Use the other half you trim off for your next notebook:)
7. Turn the sticky side down on cs and trim.
8. Here is where you get PERFECT holes every time. Use your Crop-a-dile upside down here. This will allow you to see where exactly your punching your holes.
9. See how nice and clean they are??!!! At this point you could put the front cover and spiral notebook back together. If you want to add an elaborate design or sew, I would refrain from putting the notebook back together until you've added all your embellishments.
10. Once you have your completed front, put all layers together and begin turning the spiral back into place.
11. Close and secure the ends

11. Don't forget the left side now:)
12. Now your COMPLETE! See, easy as pie right? I learned this by trial and error and each time I make a notebook now, I go thru the same motions, over and over again!
Soooooo, you wanna see the completed notebook???!!!! Well, you'll have to tune in Friday when I will share the notebook AND the coordinating card. Until then, I will keep you in suspense! Reminds me of a beach towel. What do you think?

Monday, January 12, 2009

More Purse Calendars...

aThese are the last of the holiday gifts I put together. I couldn't wait to get this realtor stamp and go to town (thanks Jillybean) . The image is from Stamping Bella (sell-a-bella) . I dug out some old papers and made some new ones for this project. Before coloring, I picked out my copics that would coordinate with the colors in the patterned paper...you know, so everything was "matchy-matchy." I un-stapled the original cover that came with these calendars and inserted (re-stapled) new fresh colors. After I finished adding the colors I used my PTI Ambassador Alphabet to add the monogram.

I'm off to run errands! Be sure to tune in Wednesday. I will be starting a new monthly feature on my blog, "Behind the Seams." Some of these posts will be tutorials while others will just share some of my favorite products to use. I'm not endorsed by the products I buy and use, just get alot of questions as to where I buy certain products and I'm more than happy to share! This week's "Behind the Seams" will be a tutorial on how to alter a spiral notebook:)